|
Drip Irrigation
Need of the Time
Introduction
Drip irrigation is the most efficient method of
irrigating. While sprinkler systems are
 around
75-85% efficient, drip systems typically are 90% or higher.
What that means is much less wasted water! For this reason
drip is the preferred method of irrigation in the desert
regions of the United States. But drip irrigation has other
benefits which make it useful almost anywhere. It is easy to
install, easy to design, can be very inexpensive, and can
reduce disease problems associated with high levels of
moisture on some plants. If you want to grow a rain forest,
however, drip might not be the best choice! around
75-85% efficient, drip systems typically are 90% or higher.
What that means is much less wasted water! For this reason
drip is the preferred method of irrigation in the desert
regions of the United States. But drip irrigation has other
benefits which make it useful almost anywhere. It is easy to
install, easy to design, can be very inexpensive, and can
reduce disease problems associated with high levels of
moisture on some plants. If you want to grow a rain forest,
however, drip might not be the best choice!
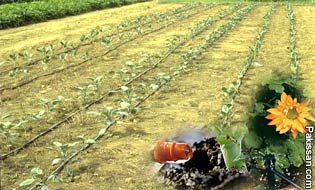
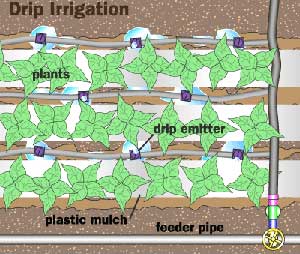
Drip irrigation (sometimes called trickle irrigation) works by
applying water slowly, directly to the soil. The high
efficiency of drip irrigation results from two primary
factors. The first is that the water soaks into the soil
before it can evaporate or run off. The second is that the
water is only applied where it is needed, (at the plant's
roots) rather than sprayed everywhere. While drip systems are
simple and pretty forgiving of errors in design and
installation, there are some guidelines that if followed, will
make for a much better drip system. The purpose of this
tutorial is to guide you toward materials and methods that
will increase the benefits of your new drip system, while
steering you away from some common misconceptions and
practices that can cause you trouble.
Why would you want to consider drip irrigation?
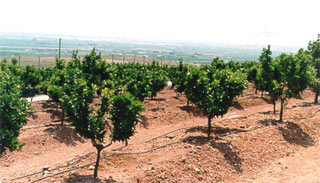
Drip irrigation can be a great aid to the efficient use of
water. A well designed drip irrigation system or subsurface
drip irrigation system will lose practically no water to
runoff, deep percolation or evaporation. Irrigation scheduling
can be precisely managed to meet crop demands, holding the
promise of increased crop yields and quality.
Drip irrigation will decrease water contact with crop leaves,
stems, and fruit. Thus conditions may be less favorable for
the onset of diseases. Often growers or irrigation
professionals refer to "subsurface drip irrigation" or SDI.
When the drip tube can be buried below the soil surface, it is
less vulnerable to damage during cultivation or weeding. Water
use can be managed to be very efficient with SDI because
irrigations can avoid water losses to evaporation, runoff, and
wetting the soil below the root zone.
Agricultural chemicals can be used more efficiently with drip
irrigation. Since only the crop root zone is irrigated,
nitrogen already in the soil is less subject to leaching
losses. Fertilizer N that is added can be used more
efficiently. Where insecticides are labeled for application
through drip irrigation, less insecticide may be required to
control pests.
With all the potential benefits of drip irrigation, conversion
to drip irrigation can increase production costs, especially
where another pre-existing irrigation system is already in
place. Ultimately, there must be an economic advantage to the
growers for them to consider drip irrigation.
Advantages of drip irrigation
1. Drip is adaptable to fields with odd shapes or
uneven topography. Drip irrigation can work well where other
irrigation systems are inefficient because parts of the field
have excessive infiltration, water puddling, or runoff.
2. Drip irrigation can be helpful if water is scarce or
expensive.
 Drip
irrigation has become common where water is very scarce or
where water is very expensive to pump. Precise water
application is possible with drip irrigation. Irrigation with
drip can be more efficient because evaporation is reduced,
runoff is reduced or eliminated, deep percolation is reduced,
and irrigation uniformity is improved so it is no longer
necessary to "over water" parts of a field to adequately
irrigate the more difficult parts. Drip
irrigation has become common where water is very scarce or
where water is very expensive to pump. Precise water
application is possible with drip irrigation. Irrigation with
drip can be more efficient because evaporation is reduced,
runoff is reduced or eliminated, deep percolation is reduced,
and irrigation uniformity is improved so it is no longer
necessary to "over water" parts of a field to adequately
irrigate the more difficult parts.
3. Precise application of nutrients is possible using
drip irrigation. Fertilizer costs and nitrate losses can be
reduced. Nutrient applications can be better timed to plants'
needs.
4. Drip irrigation systems can be designed and managed
so that the wheel rows are sufficiently dry so that tractor
operations can occur at any time at the convenience of the
producer. Timely applications of herbicides, insecticides, and
fungicides is possible.
5. Proven yield and crop quality responses to drip
irrigation have been observed in onion, broccoli, cauliflower,
lettuce, melon, tomato.
6. A drip irrigation system can be automated. For an
example of automated drip irrigation.
Disadvantages of drip irrigation
1. Drip irrigation systems typically cost $500 to $1,200
per acre. Part of the system cost is a capital investment
useful for several years and part of the cost is annual.
Systems can easily be over designed. Growers without
experience may want to start with a relatively simple system
on a modest acreage and gain experience.
2. Drip tape has to be managed to avoid leaking or
plugging. Drip emitters can easily be plugged by silt or other
particles not filtered out of the irrigation water. Emitter
plugging also occurs by algae growing in the tape and chemical
deposits at the emitter. Tape depth will have to be carefully
chosen for compatibility with other operations such as
cultivation and weeding.
3. The weed control program may need to be redesigned.
Compatibility with weed control programs can be a problem if
herbicides need rainfall or sprinkler irrigation for
activation. But, drip irrigation can enhance weed control by
keeping much of the soil surface dry.
4. Drip tape disposal or reuse needs to be planned and
will cause extra clean up costs after harvest.
Components and design of a drip irrigation system
 A
wide range of components and system design options is
available. The Digital Drip Directory provides lists of
equipment and their suppliers. Tape, depth of tape placement
in the soil, the distance between tapes, emitter spacing and
flow, and irrigation management must all be carefully chosen
to meet crop water requirements and the soil's properties.
Emitter spacing depends on the crop root system and soil
properties. Seedling plants such as onions have relatively
small root systems, especially at the beginning of the season.
The wetting pattern of water in the soil from the drip
irrigation tape must reach those roots. A
wide range of components and system design options is
available. The Digital Drip Directory provides lists of
equipment and their suppliers. Tape, depth of tape placement
in the soil, the distance between tapes, emitter spacing and
flow, and irrigation management must all be carefully chosen
to meet crop water requirements and the soil's properties.
Emitter spacing depends on the crop root system and soil
properties. Seedling plants such as onions have relatively
small root systems, especially at the beginning of the season.
The wetting pattern of water in the soil from the drip
irrigation tape must reach those roots.
1. Drip tape varies greatly in its specifications depending on
the manufacturer and its use (Table 1).
Table 1. Drip Tape Specifications by Manufacturer
(adapted from Hansen, et al., 2000)
|
Manufacturer
(Drip Tape Name)
|
Diameter (inches)
|
Wall Thickness (mil)
|
Emitter Spacing
(in)
|
Emitter Flow Rates (gal/h)
|
Chapin Watermatics
(Twin Wall) |
5/8, 7/8 |
4, 6, 8, 10, 15, 20, 25
|
2, 4, 6, 9, 12, 16, 24 |
.15-.60 |
|
Drip Tape Man. and Eng. Inc. (Tiger Tape)
|
5/8, 7/8
|
5, 6, 7-8, 10, 15
|
4 1/4, 8 1/2, 12 3/4, 17 1/4
|
.15, .21, .28
|
|
Eurodrip
|
5/8, 7/8
|
|
Customized
|
.31, .40, .65
|
|
Nelson Irrigation Corp. (Pathfinder)
|
5/8, 7/8,
1 3/8 |
5, 6, 8, 10, 15, 20 |
4, 8, 12, 16, 24
|
.13, .27, .37
|
|
Netafim (Streamline, Typhoon)
|
5/8, 7/8, 1
|
6, 8, 10, 13, 15
|
8, 12, 16, 24, 30
|
.16, .21, .33
|
|
Queen-Gil
|
1/2, 5/8, 13/16
|
6, 8, 12, 16
|
4, 8, 12, Variable
|
.05, .11, .21, .26, .31, .42, .46, .71
|
|
Roberts Irrigation Products (RO-DRIP)
|
5/8, 7/8
|
5, 6, 8, 10, 13, 15
|
4, 8, 12, 16, 24
|
.11, .24, .34
|
|
T-Systems International
(T-Tape)
|
3/8, 5/8, 7/8/, 1 3/8
|
4, 6, 8, 10, 15
|
4, 8, 12, 16, 18, 24
|
.14, .20, .27, .34, .40
|
|
ToroAg
(Aqua-Traxx)
|
5/8, 7/8 |
4, 6, 8, 10, 12, 15
|
4, 8, 12, 16, 24
|
.13, .20, .27
|
2. Distribution system, valves, and pumps must match
the supply requirements of the tape.
3. Design must take into consideration the contour:
elevation, pressure, and flow requirements. Design for water
distribution uniformity by carefully considering the tape,
irrigation lengths, topography, and the needs for periodic
flushing of the drip tape. Vacuum relief valves need to be
designed into the system.
4. Power and water source limitations need to be
considered. Water should be analyzed by a laboratory that is
qualified to evaluate emitter plugging hazards.
5. Water quality may provide limitations and increase
system costs. Filters must match worst case scenarios.
6. Injectors for chemigation should be included.
7. Flow meters are necessary to confirm system
performance
Management of drip irrigation
1. Plan for seed emergence. The drip tape needs to be
sufficiently near the surface to germinate the seed if
necessary, or a portable sprinkler system needs to be
available. For example, SDI with the tape tube 4 to 5 inches
deep has been used successfully to germinate onion seeds in
silt loam soil. Deep placement of drip tape at 12 inches
failed
 to
uniformly germinate onions. to
uniformly germinate onions.
2. Water requirements for irrigation are reduced
because water can be applied vastly more efficiently with a
drip irrigation system. For example, with furrow irrigation
systems, typically 4 acre-feet/acre or more of water is
applied to onion fields in the Treasure Valley of eastern
Oregon and southwestern Idaho. Depending on the year, summer
rainfall, and the soil, 14 to 28 acre-inch/acre of water has
been needed to raise onions under drip irrigation in the
Treasure Valley. Drip irrigation with more water than a
plant's requirement will result in the loss of most of the
drip irrigation benefits. The soil will be excessively wet
promoting disease, weed growth, and nitrate leaching.
3. Use both measurements of soil water and estimates of
crop water use called "crop evapotranspiration" or "ETc".
Irrigate only to replace the soil moisture deficit in the top
12 inches of soil. It is usually not necessary to exceed ETc .
For our local crop production area, the daily crop
evapotranspiration estimates at Ontario are made automatically
on a daily chart by the AgriMet station.
4. Chlorine or other chemicals need to be added
periodically to the drip line to kill bacteria and algae in
the drip lines. Acid may be needed periodically to dissolve
calcium carbonates.
5. Filters must be managed. In spite of filtration,
drip tape must be flushed, with a frequency that is dependent
on the amount and kinds of sedimentation in the tape.
6. If irrigation is managed closely to meet plant water
needs, nitrogen fertilizer requirements are reduced because
nitrate leaching is reduced or nearly eliminated. Total
nitrogen requirements are reduced using drip irrigation and
less nitrogen should be applied in each application. Our
experience is that if fertilizer nitrogen applications are not
reduced, an onion crop under drip irrigation will become
excessively leafy. The leaves can inhibit curing and increase
harvest costs and increase harvest losses.
7. Fertilizers containing sulfate, phosphate, calcium,
or anhydrous or aqua ammonium can lead to solid chemical
precipitation inside the drip tape. The precipitates can block
emitters. Seek chemical analyses of your irrigation water and
competent technical advice before injecting chemical
fertilizers into drip tape.
8. Root intrusion needs to be controlled for some
crops.
9. Rodents must be controlled, especially where drip
tape is buried to provide irrigation for a number of years.
The Basic Parts of a Drip
System:
Valve-
Use any valve you want! They can be automatic or manual. If
you use an anti-siphon valve it has a built-in backflow
preventer which saves money! (But be sure to read up on
backflow preventers first, as anti-siphon valves won't work in
some places. For more
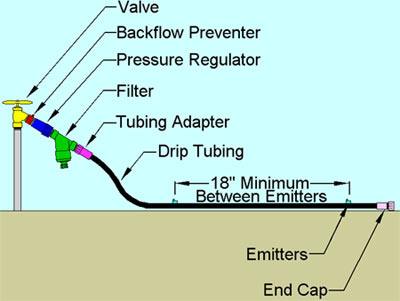 information
on valves. information
on valves.
Backflow Preventer-
You need to use a backflow preventer on ALL drip systems. No
exceptions! For more information on backflow preventers.
Pressure Regulator-
Most drip systems will need a pressure regulator. You need one
if your water pressure is over 2,8 bars (40 PSI). If in doubt,
install one. The regulator can go before or after the valve.
Traditionally it is installed after the valve.
Filter-
You must use a filter. Drip emitters have very small openings
that are easily clogged. City water is not free from stuff
that will clog your emitters! Use a 150 mesh screen or one
with a higher mesh number like 200 mesh. The filter may be
installed before the valve or pressure regulator, but the
inexpensive plastic filters often sold for drip systems should
be installed after the pressure regulator. I like to use a top
quality filter and install it right at the water source so it
protects the valves and the pressure regulator too. Most valve
failures result from sand or rust particles clogging of the
tiny passages inside the valve! Use a filter that is the same
size as, or larger than, the valve.
Emitters-
Most emitters emit 4 liters/hour (4,0 l/hr) of water. That's
about 1 gallon per hour (1 gph). I prefer a lower flow rate
than that, and use mostly 2,0 l/hr (0.6 gph, often referred to
as "1/2 gallon per hour") emitters on my drip system designs.
Use pressure compensating emitters if you are irrigating a
hilly area. There are many different types and brands
available.
Multi-Outlet emitters are very popular. They also suck!
(That's a personal opinion, based on years of observation.)
Use single outlet emitters for a less troublesome drip system.
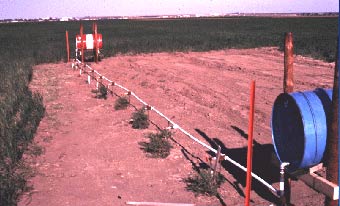
Mainline-
The mainline is the pipe that goes from the water source to
the valves. In the illustration of a very simple drip system
above the gray colored vertical pipe under the valve is a
mainline. The mainline may be made of galvanized steel,
copper, SCH 40 PVC, SCH 80 PVC, Cl 315 PVC, Heavy Wall
Polyethylene (SDR 7 or SDR 9). Do not use polyethylene for the
mainline unless approved by your local building officials.
Polyethylene has a low burst pressure and should only be used
for mainlines where local conditions are appropriate.
Sub-Main-
The sub-main is the pipe that goes from the valves to the
connection point of the drip tube. Many small drip systems do
not have a sub-main, in those systems the drip tube connects
directly to the valve The illustration of a very simple drip
system above shows a system without a sub-main. Sub-mains are
usually Cl 200 PVC pipe or standard weight polyethylene (poly)
pipe. You use a sub-main when multiple drip tubes are needed.
Drip Tubing-
Drip tubing is a thin wall polyethylene tube, and is generally
produced in metric sizes. Common sizes are 12 mm (0.455" or
3/8"), 16mm (0.620" or 1/2"), 18mm (0.720" or 1/2"), and 24mm
(0.940" or 3/4"). Do you see the problem? Two sizes are
commonly referred to as "1/2 inch" in the USA! The fittings
for these two are not interchangeable. So make sure you know
what you're getting when you buy it! Do not bury drip tubing
underground- gophers and moles love to chew buried tubing!
Adapters and fittings-
Used to attach the drip tube to the other parts. Important-
make sure the fittings are the exact right size! Using
fittings made for a different tubing size will result in the
tube blowing out of the fitting. 9 times out of 10, when a
tube blows out of a fitting it is because the fitting is the
wrong size.
End Cap-
The end cap is important. Without it the water all runs out
the end of the drip tube.
Additional Resources:
Drip Irrigation for Row Crops. 1994. Chanson, Schwankl,
Grattan, and Prichard, University of California, Davis. Order
from Cooperative Extension office, Department of LAWR, 113
Veihmeyer Hall, University of California, Davis, CA 95616,
telephone (530) 752-1130.
B.C. Trickle Irrigation Manual. 1999. Van der Gulik,
B.C. Ministry of Agriculture and Food Resource Management
Branch. Order from Irrigation Association of British Columbia,
2300 Woodstock Drive, Abbotsford, B.C., Canada, V3G 2E5,
telephone (604) 859-8222.
Fertigation, 1995, Burt, O'Connor, and Ruehr,
California Polytechnic State University. Order from The
Irrigation Training and Research Center, California
Polytechnic State University (Cal Poly), San Luis Obispo, CA
93407, telephone (805) 756-2434.
Microirrigation Management and Maintenance. 1998.
Hassan, Farouk A.. Fresno, CA, Agro Industrial Management,
1998. The book is available from Farouk A. Hassan, Ph.D.
Irrigation & Soils Consultant, Agro Industrial Management, P.
O. Box 5632, Fresno, California 93755, U.S.A. Phone:
(209)224-1618, Fax: (209) 348-0721,
References:
- Irrigationtutorials.com (Jess
Stryker's )
- Malheur Experiment Station (Clinton
C. Shock)
Oregon State University
Edit by M. Irfan
|
Pakissan.com;
|